How To Use KineMaster? (Complete Step By Step Guide)

Welcome to the journey of creative discovery with “How To Use KineMaster? (Complete Step By Step Guide),” your ultimate roadmap to mastering the art of video editing. This guide is a treasure trove for both novices and seasoned creators, simplifying the complexities of KineMaster into easy-to-follow steps. As you explore these articles, you’ll unlock the secrets of crafting visually stunning stories and transforming raw footage into captivating masterpieces. From basic cuts to advanced effects mivi editor, each chapter unfolds new skills and techniques, guiding you through the exciting world of KineMaster with clarity and ease. Get ready for your creative potential and bring your unique visions to life, one frame at a time.

Read: How To Use Green Screen on Kinemaster

How To Use KineMaster? Step By Step Guide

Step 1: Download and Install KineMaster

Read: Play store link KineMaster app

How To Use KineMaster

Step 2: Create a New Project

  • Starting Your Project: Tap on the ‘+’ sign to start a new project. Select the aspect ratio suitable for your project (16:9 for YouTube, 9:16 for Instagram stories, etc.).
  • Understanding the Workspace: Familiarize yourself with the user interface, including the timeline, preview window, and various tool icons.
Create a New Project kinemaster

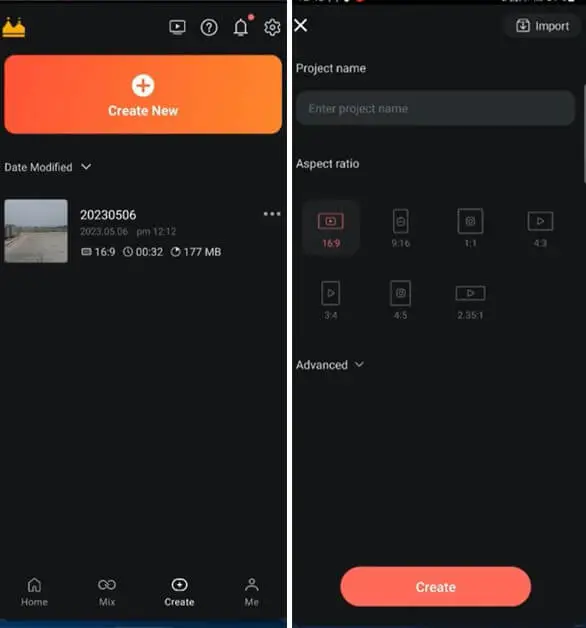
Step 3: Importing Media

  • Adding Video Clips and Photos: Tap on the ‘Media’ button to import video clips, images, and music from your device. You can select multiple files at once.
  • Organizing Your Timeline: Drag and position your clips on the timeline. You can adjust the length by dragging the edges of each clip.

Read: How to Make Slow Motion Video in KineMaster

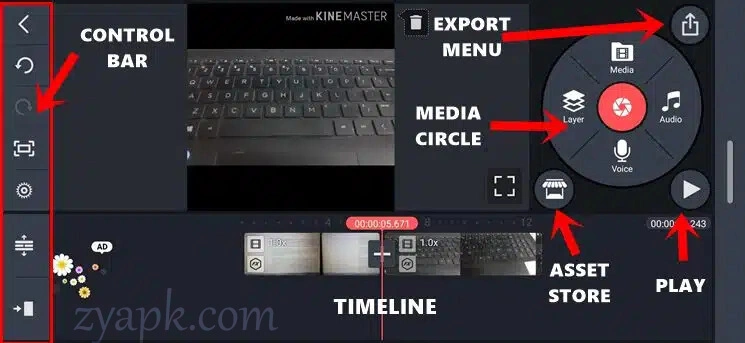
Step 4: Editing Basics

  • Trimming and Splitting: Use the scissor tool to trim or split clips at desired points.
  • Adjusting Clip Settings: Tap on a clip to adjust its settings, like brightness, contrast, and saturation.
Menu Basic Editing setting

Step 5: Adding Transitions and Effects

  • Enhancing with Transitions: Between clips, tap the transition icon (looks like a small square) to add transitions. Choose from various options like fades, wipes, and more.
  • Using Effects: Explore the effects section to add filters, overlays, and other visual enhancements.
How to use transitions in your videos

Step 6: Working with Audio

  • Adding Music or Sound Effects: Tap the ‘Audio’ button to add background music or sound effects.
  • Adjusting Audio Levels: Ensure your audio levels are balanced by adjusting the volume of your clips and the added audio.

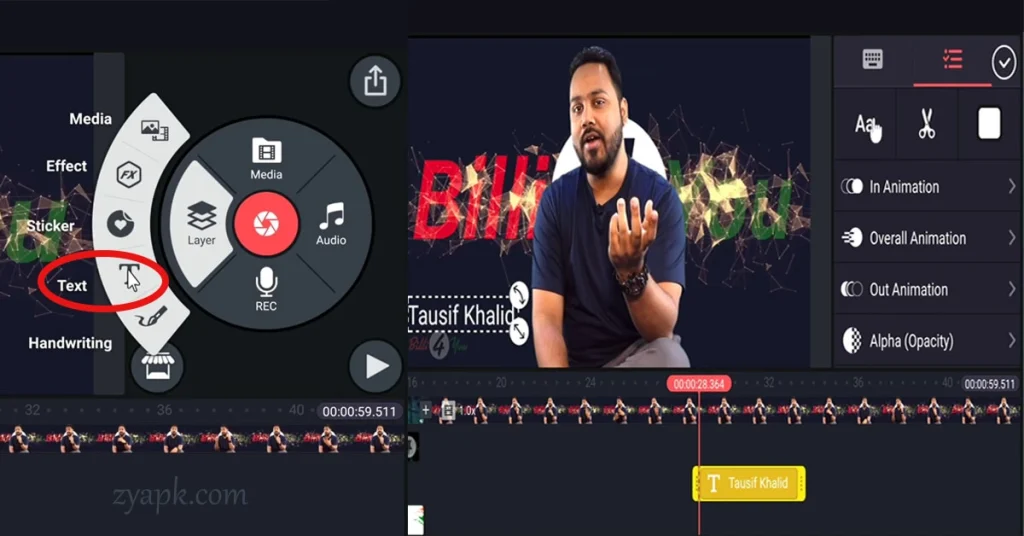
Step 7: Adding Text and Titles

  • Incorporating Text: Use the ‘Text’ button to add titles or captions. Customize the font, color, size, and animation of the text.
  • Animating Text: Select from various animation options to make your text appear dynamically.
Adding Text and Titles

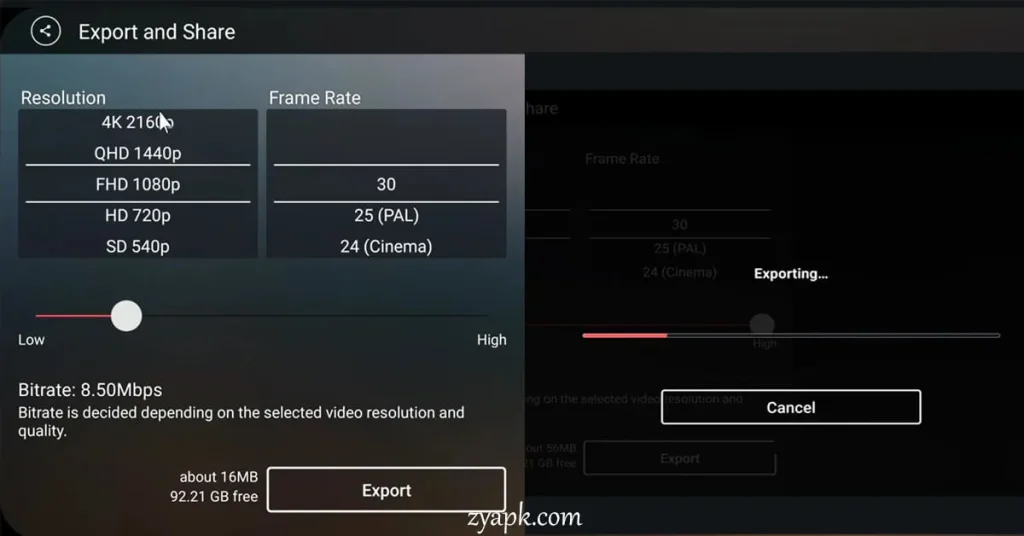
Step 8: Exporting Your Video

  • Finalizing Your Project: Once you are satisfied with your editing, tap the ‘Share’ button (the square with an arrow).
  • Choosing Export Settings: Select the resolution and frame rate for your video. Higher resolutions, like 1080p, offer better quality but result in larger file sizes.
  • Saving and Sharing: Export the final video to your device, or share it directly to social media platforms or cloud storage.
Exporting Video Kinemaster

Step 9: Continuing to Learn and Explore

  • Experiment and Practice: The best way to master KineMaster is by experimenting with all its features and practicing regularly.
  • Staying Updated: Keep an eye on updates as KineMaster often adds new features and improvements.

Read: How To Use VivaCut for Video Editing

FAQ

Yes, KineMaster can be used for free, but the free version comes with certain limitations. It includes a watermark on videos and may have restricted access to some premium assets and features. You can remove these limitations by subscribing to KineMaster Premium.

Yes, KineMaster supports 4K video editing, but it depends on the capabilities of your device. If your device supports 4K, then KineMaster can be used to edit and export videos in 4K resolution.

Yes, one of KineMaster’s standout features is its ability to handle multi-layer editing. This allows you to add and manipulate multiple layers of video, images, stickers, special effects, text, and handwriting, offering a rich editing experience.

Conclusion

KineMaster emerges as a compelling tool for anyone keen on getting into the art of video editing. Its intuitive design, paired with a suite of professional-grade features, makes it accessible for beginners yet powerful enough for seasoned editors. Through this guide, we’ve explored the essential steps to navigate and harness KineMaster’s capabilities, from basic editing to advanced effects. The journey with KineMaster is one of endless creative possibilities, where each function and feature opens new doors for storytelling. As you continue to explore and experiment, KineMaster stands ready to transform your creative visions into captivating video narratives.

Leave a Reply

Your email address will not be published. Required fields are marked *